2021-07-05
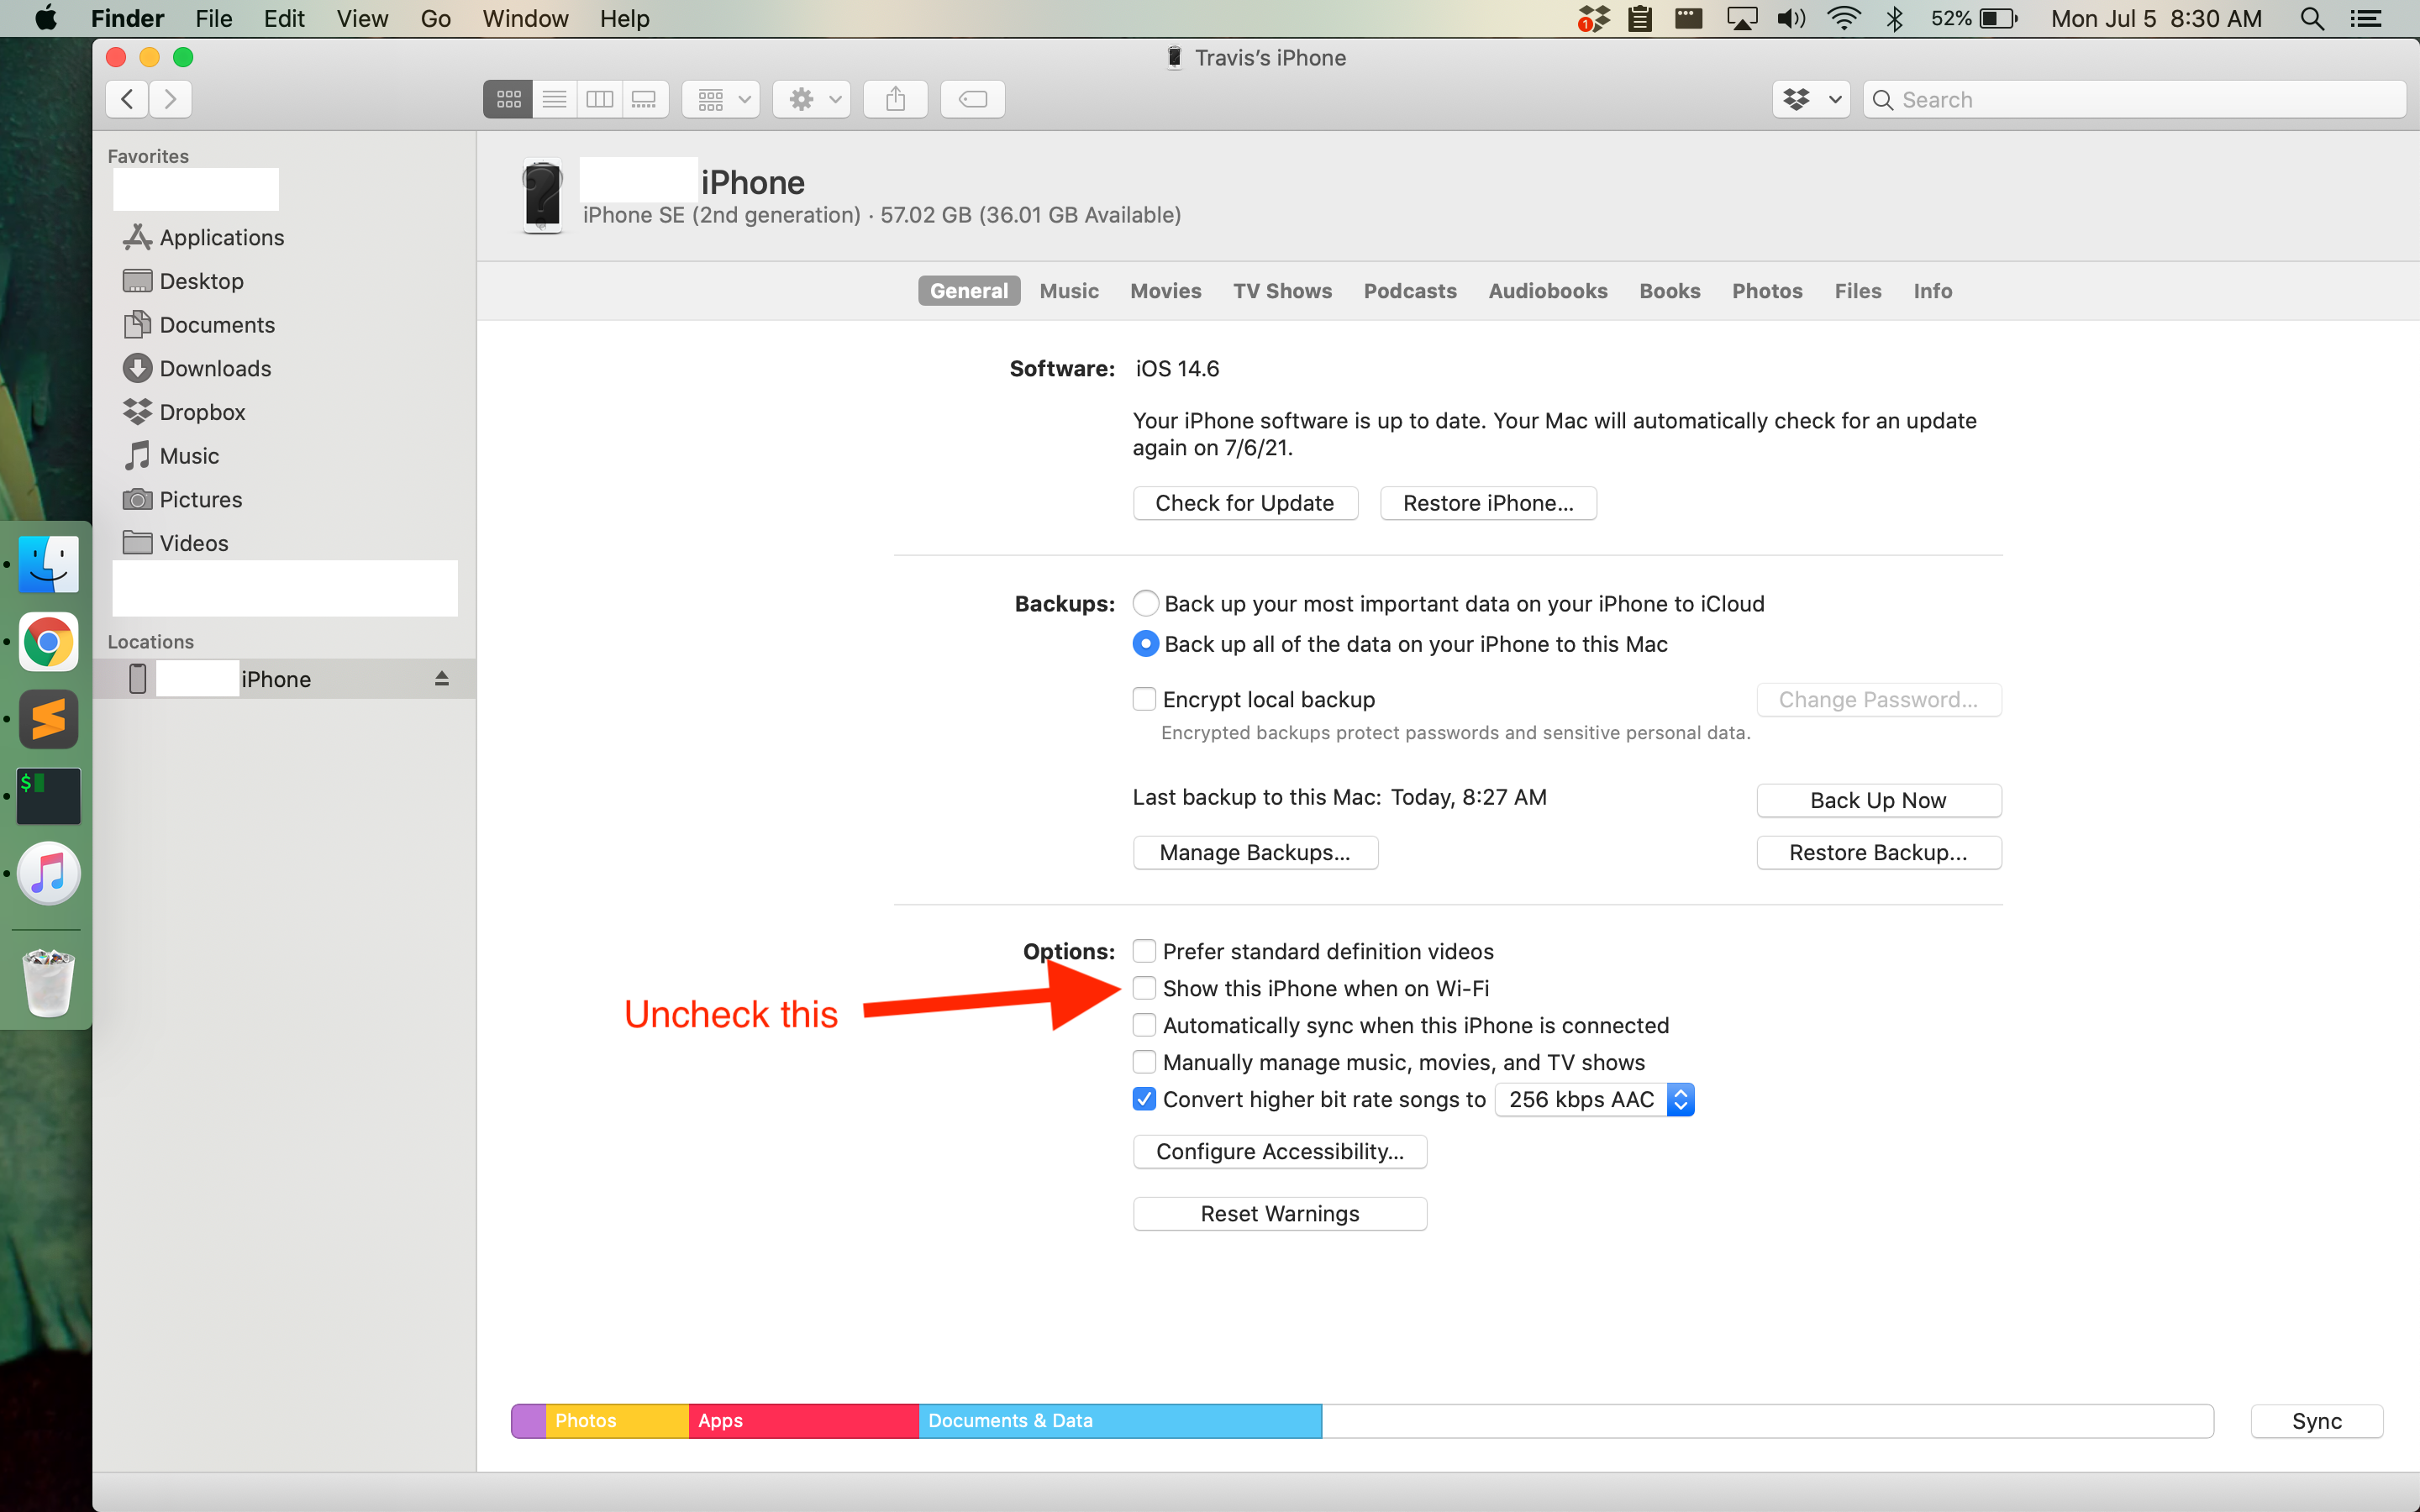
TL;DR: Turn off the "Show this iPhone when on Wi-Fi" setting in the iPhone settings using Finder in macOS.
I've been having trouble getting my iPhone to sync with a MacBook Air running macOS Catalina 10.15.7. When it syncs at all, it does it extremely slowly. I was syncing over wifi, so when I got tired of waiting I connected it to my MacBook with a USB cable. But it was still just as slow.
I had a hunch it was still syncing over wifi even though it was physically connected via USB. So I went into the iPhone settings in Finder (you can get there via Finder's sidebar -- click on your iPhone there) and turned off the "Show this iPhone when on Wi-Fi". After that, syncing was very fast.
2021-04-02
I recently decided to start using my Fitbit Charge 3 to receive notifications from my iPhone again. When activated, the Charge 3 can receive SMS, Calendar, and call notifications from your iPhone.
I had the settings in the Fitbit app on my iPhone set to “All Day Sync” and notifications turned on but I still was not receiving notifications on my Fitbit.
I searched online and followed all of the guides that would supposedly fix this, but none of them worked for me.
I finally realized the Fitbit itself had the Notifications setting set to off. All I needed to do was hold down the button when on the Notifications screen, pictured below:
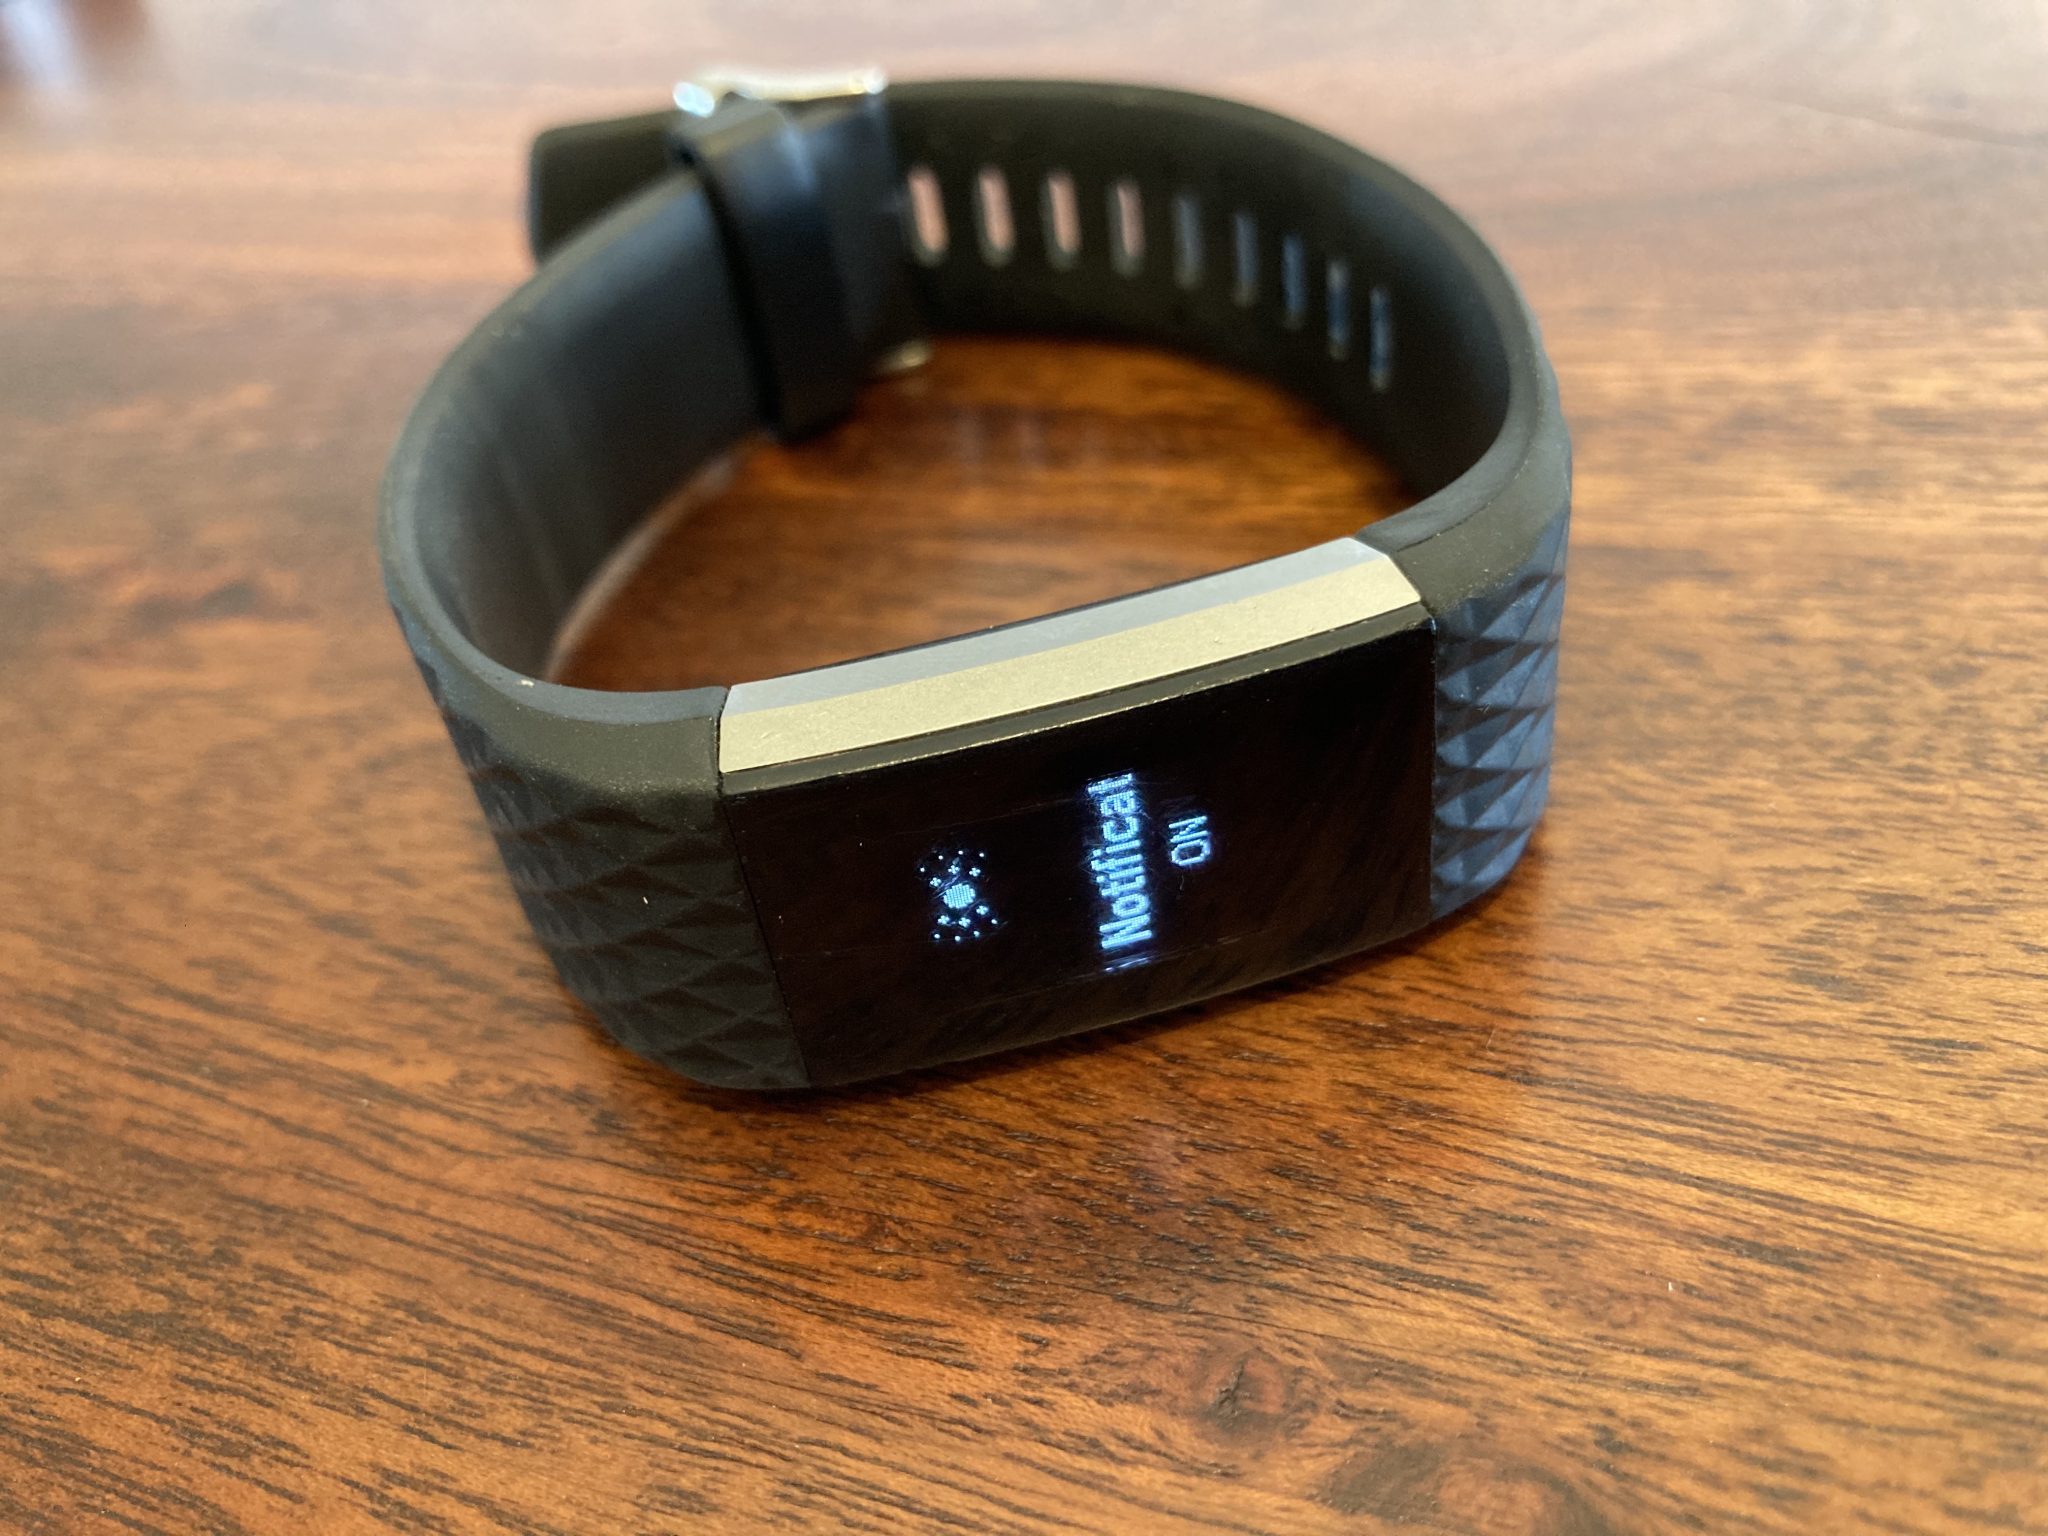
So if you have exhausted other solutions, make sure the Fitbit’s setting is set to receive notifications on the device itself.
2021-01-16
TL;DR: I had to delete the Nest Thermostat from the Nest app, then set up Nest Protect first. After that, I re-added Nest Thermostat in the Nest app.
I ordered a Nest Learning Thermostat and four Nest Protects at the same time. I ended up installing the thermostat a few days before I had time to install the Protects.
When I attempted to add the first Nest Protect in the Nest App, the directions never told me to pull the battery tab to power on the Protect, so of course the thermostat could not find it to assist in setting it up.
I figured the Protect at least had to have power, so I pulled the tab so the batteries could make the connection and power the device. Still, the Nest Thermostat could not find either of the first two Protects I tried to set up.
I figured the app also accounts for people setting up a Protect with no thermostat or other Nest device set up yet — so I deleted my thermostat from the app. Once it was gone and not “assisting” me, the Protects were added without trouble.
I re-added the thermostat using the app, the first Protect successfully “assisted” me in setting up, and we’re off to the races. I still don’t know what went wrong originally, but all five devices are set up now.
2020-10-31
Updated with new Wyze firmware (Nov 30 2020)
I bought a Wyze Cam v2 on a whim today. I usually run PoE cameras that record to my local server running Zoneminder. I wanted to see what the other world was like: a wireless camera that records to the “cloud” (a.k.a. some other guy’s server). It has its perks:
- No server to configure, maintain, etc.
- Easy access to camera feed outside of your local network (don’t need to get your ISP to open ports).
Unfortunately, I wasn’t that impressed right off the bat. I should have read the reviews more closely. When setting up the camera, I realized if you don’t buy a Wyze Plus membership, the camera records 12 seconds on motion detection and then has a five minute cooldown! The 12 second recording didn’t bother me much, but you can miss a ton in the five minutes after that.
So I googled “Wyze onvif”, without much hope, to see if I could get this camera working with Zoneminder. Lo and behold, Wyze has kindly released a beta firmware version for their v2 camera. I followed these directions to get it set up to provide an RTSP feed for Zoneminder (original link from Wyze – Wyze Cam RTSP):
- Download the beta firmware for the camera: Wyze Cam v2 RTSP Firmware or Wyze Cam Pan RTSP Firmware
- Unzip and rename the file to demo.bin
- Put the file on an SD card. Put it at the root directory, not inside any folder on the SD card.
- Hold the “Setup” button on the camera as you are plugging the camera’s power cable in. When the status light turns blue, you can let go of the the “Setup” button.
- Wait 2 to 3 minutes for the camera to install the firmware.
- Open the Wyze app and go to Settings -> Advance -> RTSP
- Enable RTSP and copy the url. It will have you enter a username and password for the RTSP feed. My url looked like rtsp://username:[email protected]/live
- Enter that in the “Source Path” of the “Source” tab in Zoneminder’s monitor set-up window.
And bam! Mine was receiving the feed after those steps. The Wyze v2 Cam is 1080p so that’s what I set mine to in Zoneminder. I’ll be testing it over the coming days/weeks so I will add any other tweaks I find necessary to this post.
If you’re interested in the camera, you can check it out on Amazon here: Wyze v2 Cam (compatible with Zoneminder).
2020-10-29
After adding a third camera (a Reolink RLC-520) to my Zoneminder server, I found that I couldn’t get all three cameras to come up at the same time. I would restart and 2 would successfully enter the “Running” state but a third (not always the same one, either) would not.

I then noticed that /dev/shm was red and at 100% in the status bar. After some research, I found that this is usually caused by the cameras’ resolution being set to high for the RAM the server has.
I lowered my resolution to 1080P on two cameras and 3MP on the third. This dropped the /dev/shm usage to what is seen in the screenshot above.
My server has 8GB of RAM, which I may upgrade soon. If you run into this problem, try lowering the resolution of your camera(s) in Zoneminder’s config for each one.